
This post documents my modifications to the Sunfish sailboat PVC dolly which is described at
https://my2fish.wordpress.com/2015/06/25/sunfish-pvc-dolly-handle-plans/
Many thanks to my2fish for the original plans, they are clear and easy to follow. If you want to build the dolly with my changes, you should start with that blog post and download the PDFs supplied there. There are separate plans for the dolly itself, and for the handle. I am not duplicating those plans here, just documenting the changes that I made.
Changes to the my2fish design were motivated by the need to use this dolly in a saltwater environment where steel parts corrode very quickly. Along the way I made some other changes, especially to the handle. A list of the parts used in the modifications are at the end along with links to sources.
Axle Design
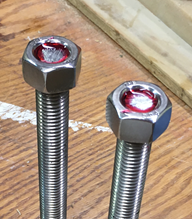
The most significant design change to the dolly is removing the use of a long threaded steel rod for the axle. To prevent corrosion in saltwater, metal parts need to be stainless steel. A 36” stainless threaded rod is expensive, so I changed the design to use either two short (6”) stainless steel rods, or two 6” SS bolts. Bolts or rods can be used depending on what is available. If bolts are used, note they must be “fully threaded” – which is not common in 6” SS bolts, thus my build used a 12” SS rod cut into two 6” pieces. To make these rods into bolts, fix a nut at one end using Locktite Red. Once the Locktite has set you effectively have two 6” SS fully threaded bolts:
The wheels I chose have 5/8” hubs, so I used 5/8” threaded stainless steel rod and hardware. Use whatever hardware size fits the wheels you choose.
The axle bolt is fixed in place through a series of PVC fittings, nuts, and washers:

The bushing assembly is made from a 1¼ to ¾” converter bushing with a small piece of ¾” PCV (schedule 40) pipe glued inside. The ¾” pipe is cut to be flush with the surface of the bushing. This photo shows the pipe pulled out a bit to make the assembly clear:

This assembly creates a bushing with a center hole just over 5/8” to accommodate the threaded rod. I added the ¾” inside pipe to help keep the axle centered, but it is not strictly necessary – the nuts are tightened against the bushing and hold the axel in place. The interior pipe does make the entire bushing a bit stronger and more rigid.
The axle is assembled as shown in the photo. The bolt head (or nut+Locktite) and washer fit into the open end of the bushing. The normal 5/8 washer would not fit into the open end of the bushing, so I had to drill out a smaller washer with a 5/8 bit. The 1¼” washer on the outside provides a large bearing surface to tighten the nut and lock washer. If this is to be used in saltwater be sure all hardware is stainless steel.


Now this bushing and axle assembly is ready to slip-fit and be glued into the 4-way cross fitting, opposite the axle pipe (section f of the original my2fish design diagram). In this photo the axle pipe has not been installed yet:

Instead of drilling a hole in the axle and using a cotter pin to secure the wheel in place, I used a nut with nylon lock insert. This avoiding having to drill a hole through the threaded rod, and still keeps the nut in place even though it is not tightened against the wheel bearing. You could also use a double-nut to do the same thing.
Wheel Selection
Before buying any axle hardware you need to select the wheels you will use. I expect to use this dolly on some rough surfaces with bumps and ruts, but not sand. The larger the wheel the easier it is to move the boat over ruts and bumps.
There are no stainless steel wheels, so for saltwater environments your choices are all rubber/plastic, or steel wheels you will have to replace every year or two. I chose to use a steel wheelbarrow replacement tire with an inner tube. The tire has a diameter of about 14” (rim 8”) and cost about $30 each at Northern Tool. This works well over rough terrain. Be sure to keep the bearings greased to extend the life of the wheel.
Dolly Width
Since the width of the dolly is no longer constrained by the length of an axle rod, I made the dolly 24 ½” wide (center of bunkers) instead of the 21” in the original design. That changes only the length of a single pipe segment (segment f in the my2fish plans) from 19 ½” to 22 ½ “.
All the other pipe dimennsions were built as specified in the original my2fish design.
Dolly Handle
For my purposes, the optional dolly handle is a must for navigating rough terrain. As I considered the design I realized it was going to make the dolly very big and cumbersom to transport, so I came up with a way to make the handle detachable very quickly with no tools required using 2 trailer hitch pins (“wire lock pins”).
After my first dry-fit test of the handle, I also realized that the bunkers are a problem when the dolly is empty. Since they spin freely on the axle, they flop down and drag the ground either in front of, or behind the axle. So I modified the handle to provide a place for the bunkers to rest off the ground when there is no boat on the dolly.
Handle Attachment
Like the original design, the handles are connected to the axle through two PVC Tee connectors that are larger than the 1 ¼ axle pipe. The Tees (1 ½”) slip over the axle pipe and spin/slide freely on it. (Remember to put these Tees on before gluing the axle pipe to the bunker supports!) Unlike the original design, the Tees are not reducing (e.g. all 3 sides of the Tee are 1 ½”). I could not find a reducing Tee from 1 ½” to 1” so I used a reducer insert fitting. If you can find such a reducing Tee it will save one fitting.

The reducer is used to accommodate a 1” connector pipe. The 1” pipe is glued into the reducer, and the reducer is glued into the Tee. No other joints here are glued.
The handle leg slips over the 1” connector pipe and is pinned in place with a hitch pin. It is convenient that a 1” SCH 40 pipe fits nicely inside a 1 ¼” SCH 40 pipe. To build this, complete your assembly of the dolly (with Tees over the axle pipe) and the handle. Then slip the ends of the handle over the 1” connector pipes and hold in place while drilling a ¼” hole straight down all the way through both pipes:


A hitch pin holds the handle to the connector pipe (and thus the axle). Removing the handle is just removing the 2 hitch pins and sliding the handle off the connector pipes.

Bunk Supports
When the dolly is empty the bunks spin around the axle and rest on the ground. This makes it difficult to move the dolly around by the handle without a boat on it.

The solution is to add 2 short pipes to the handle that catch the bunks when they lean forward (in front of the axle) and keep them off the ground:

To move the dolly around, just put the bunks forward and it can be moved without dragging the bunks. You can add caps to the bunk support pipes if you want.
Handle Length
I suggest you build the handle a few inches longer than needed and leave the longest pipes unglued. Test fit everything with your boat and get the balance just right.
Position the boat on the bunks so just enough weight is forward to keep the boat from tipping back, but not so much that if feels heavy when lifted by the handle.
I found it useful to find the boat’s center of gravity by putting a wood block on the ground and balancing the boat on the it (front-to-back). You will want the wheels of the dolly to be about 6 inches behind this balance point.
Keep in mind that when you dry-fit PVC joints they often do not fit completely together. Measure carefully when making the final cut for your handle length.
When the boat is well balanced on the bunks, shorten the handle by cutting the pipes, such that the bow fits into the head of the handle like this:

[Edit: That turned-down Tee in the handle nicely keeps the bow in place… but I found it will also scratch up the paint as it scrapes the deck. Need some kind of soft pad there to prevent messing up the paint.]
Dimensions
Here are the handle dimensions that worked for our boat. The original design document has only some overall measurements and not the pipe cut lengths. This handle is a bit narrower (about 11” stead of 12”) than the original design so the tip of the bow fits snug into the front of the handle.

The key dimension is the 87” from the base of the handle to the center of the 45 degree turn-up elbow. You may want to adjust that a bit for your particular boat, depending on its exact size and balance point. Note that if you don’t get pipe ends fully seated in the fittings, it affects the overall length of the handle. The pipe cut lengths assume the pipes are fully seated (1.25 inches) into the fittings.
| Segment | Cut Length, inches | Number Needed |
| A1 | 11 | 2 |
| A2 | 12.75 | 2 |
| B | 31.75 | 2 |
| C | 21 | 2 |
| D | 10 | 2 |
| E | 9.5 | 3 |
| F | 9.25 | 2 |
| G | 3.5 | 2 |
| H | 4 | 2 |
The length of the B pipes can be adjusted to fit your particular boat.
Build Notes
- Use only schedule 40 PVC pipe. I tried to save some money and weight by using thin walled PVC (made for waste water systems) but it is too flexible.
- Don’t cut corners when gluing PVC – use the recommended primer (the purple stuff) just before applying the solvent. It really does make a much stronger joint. Read the directions on the primer and the solvent containers and follow them.
- PVC connections swell when glued together and will push the pipe back out of the connector if you don’t keep force applied until the glue sets. Measurements get all wonky when pipes are not fully seated in the connectors, so keep them fully seated and pushed together for 30 seconds or so when gluing.
- Mark your pipes before gluing. The 1 ¼” pipe should be inserted 1 ¼” inches into the fittings for a full fit. You cannot usually force them in that far when dry, they go in much easier when the solvent is used. Draw a line on the pipe 1 ¼” back from the end before gluing and use it as a guide so you know when the pipe is fully seated.
- You can paint your dolly when complete with plastic-compatible paint. I found these instructions (https://www.bobvila.com/articles/how-to-paint-pvc-pipe/) online, but not sure I will go through the trouble. White with purple accent stripes is not so bad 😊. And keep in mind that paint may rub off on your boat.
- Yeah, yeah, I know, technically PVC is not “glued” it is “welded” with a solvent.
Parts Reference
Below are links to the parts I used for the handle and dolly modifications. I do not endorse any particular store or vendor, this is just what I chose to use at the time (June, 2021). These links may get out of date over time. I did not include links for the common items like pipe sections, common fittings, primer, solvent, etc.
Axle Parts
5/8” stainless steel threaded rod, 12” long
Package of 5/8” stainless steel nuts (4), washers (4) and lock washers (4)
1 1/4″ to 3/4″ reducer bushing
5/8” stainless steel nut with nylon lock
Locktite Red
14” wheel
Handle Connector Parts
1 ½” to 1” PVC reducer bushing
1 ½” PVC Tee
5/16” wire lock pin (hitch pin)
Photos
Here are some photos of the finished dolly and handle.


I love it! the handle attachment is fantastic… I might just have to incorporate that into my dolly.
and I just told my son I wish I hadn’t painted mine, the black paint will occasionally rub off and leave black marks on the edges of our Sunfish/Minifish hulls.
LikeLiked by 1 person
Thanks so much for the Write up – I made a home depot shopping list that might help people get this done a bit faster. Currently the whole thing costs about $235 if you include supplies like the PVC glue & cutter. I didn’t use the wheels on this list though because I already had some similar ones for my canoe cart.
https://www.homedepot.com/list/view/details/8e2aa6b0-361f-11ee-a2d9-63bd9410697d
LikeLiked by 1 person
Great idea, thanks for posting it!
LikeLike